
Basic Hand Tools Infographic
So here’s the situation: you’ve just purchased a brand new fancy mirror to place in your bathroom and are ready to install it. You get out all your tools, measure up the wall, fit the drill bit into your drill and start drilling – then suddenly *crack*, you’ve just completely shattered a whole tile. I must admit, this has happened to me before – when I wasn’t very experienece with tools and home handyman work. So, how do you drill a hole in a tile? I’m going to go through the simple steps – to ensure a nice clean hole, and no cracked tiles.
1. Use an old bedding sheet or large sheet of plastic to cover up surfaces that you do not want to get dust and debris on.
2. Find the position (roughly, doesn’t have to be exact) of where you want to drill, then place 2 layers of masking/painters tape in that position, so that the tape is in the shape of an X. The tape will help prevent the drill from slipping on the tile.

3. Use a pen to park on the tape the exact position that you want to drill. Then use a center punch and hammer to make an indent on your pen mark. Be sure not to hit too hard with the hammer. how
4. Place a Carbide tipped masonry bit into your drill and set the drill to regular drilling – NOT hammer drill.
5. Ensuring the drill is square to the wall, use a moderate pressure to drill the hole. Do not be too impatient in this step and try to force too hard, you will crack the tile.
That’s how to drill in a tile – it’s very simple and even the most inexperienced handyman will be able to perform this task with ease. The most important thing is to Carbide tipped masonry bit, a normal drill bit will simply not work.
Most tools have a set of rules and precautions that only apply to that tool. But there are some safety precautions that apply to every tool. Learn these rules off by heart, or better yet, have them posted up in your workshop and you’ll always be off to a safe start.
The safety tips I’ve outlined above should be kept in mind at all times.
One of the electronic gadgets that has made my life easier around home and on the work-site is the fluke multimeter. Whilst they’re mainly used by electricians in their day to day jobs, I decided to buy one to help me check if wires were live when I needed to work near them. It would be a disaster if I were to cut through a live wire with a circular saw! There are many, many different brands of multimeters on the market and some range from as little as $50 right up into the $500 ranges. You want to make sure you get the right one to suit your needs, so I recommend reading some guides before making your purchase. There’s a great guide, with what you should look out for here: http://www.themultimeterguide.com/
Far from that, I write this article with the aim of informing you on how to measure temperature with a multimeter. Not all meters have the ability to measure the temperature. I personally have the Fluke 87V, it’s one of the top of the range multimeters you can buy.
Why would you want to measure temperature? Here are just a few ways I’ve used my meter to take temperature readings in the past:
The first way to measure temperature, if that functionality doesn’t come as standard on your meter, involves interfacing a temperature sensor to your test probes. You will have to create a small circuit, with some resistors and a TMP35 temperature sensor and then take your multimeter apart and carefully place it inside. Once you’ve done this, you simply select the millivolts setting on the dial and take the reading. If the reading is 335 millivolts, then you have 33.5 degrees Celsius. The TMP35 is set to Celsius, so you will need to do some converting if you wish to know the degrees in Fahrenheit. The guys at Instructables have written up a great step by step article that will show you how to do this method. Instructables Article

The other, much easier way to measure temperature with your multimeter is by using a meter which has temperature measuring capabilities already built in. You simply plug in the thermocouple adapter, switch the dial to temperature and start measuring. To select between Fahrenheit and Celsius, press the range button.

There you have it, the two most common ways to measure temperature with your multimeter.
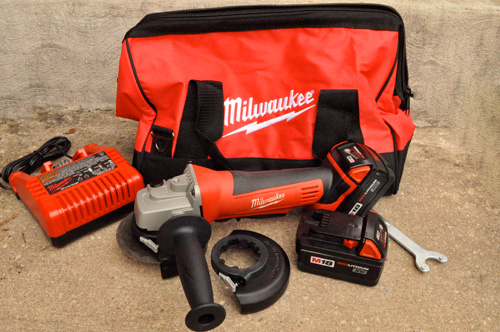
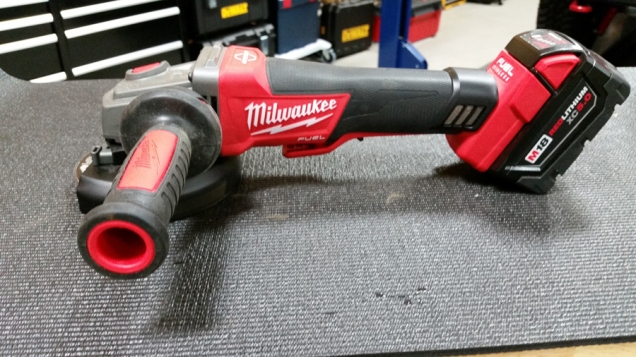
Milwaukee are known to consistently produce some of the best power tools on the market, making improvements as they see fit to guarantee customer satisfaction. I’m know to upgrade to the latest gadgets in the industry to make life easier, so taking a closer look at the Milwaukee M18 cordless grinder definitely was a must. Here is my personal review of the Milwaukee M18 Cordless Grinder that includes the outstanding features and pros and cons that I found using it, which will hopefully put you in a better position when deciding whether to purchase it.
Powerful
The Milwaukee M18 cordless grinder’s most outstanding feature is its power. With the 4 pole brush-less motor, maximum power is delivered be it when grinding or cutting. With an RPM of 8500, you can see it is a powerful tool, capable of performing even the toughest of tasks.

Click here to read more about the advantages of brush-less motors.
Customized Handle
With vibrations rampant in most power tool grinders, getting a good grip of the handle to ensure that it does not slip in your hands while working is important. The Milwaukee stands out as the handle is slim enough to get the whole hand encircled on it. The additional rubberized side grip handle ensures that the tool will be comfortable to use.
Protective Screen
One of my favorite features is the easily adjustable protective screen. With metal being ground and sometimes breaking off and fine dust flying up in the air, the protective screen comes in handy to ensure I’m not not overly exposed.
Tool Free
Changing of guard positions is vital when it comes to grinding metals and get the perfect cut. However unlike other grinding tools changing of the guard positions with the Milwaukee is easy. This comes about as all I had to do was press the lever to adjust the position and grind away.
Pros
Looking at the Milwaukee M18 cordless grinder review, the advantages easily seen are;
• Tool warranty of up to 5 years and battery up to 2 years
• Comes with functional additions such as a carrying case, flange nuts, wheel guard and spanner wrench
• Has L-shape vents which are handy, stopping fragments from entering the tool and damaging it in the process
• Has an overload protection that ensures no damage comes to the tool when there is battery damage or the tool overheats.
• Being cordless it is the most powerful grinder found without having to drag a cord along while working.
• Runs longer than other grinders on the market as it uses 4.0 A/h batteries

Cons
The only disadvantage that I found when testing the Milwaukee M18, is that the spare batteries can be quite expensive, and ideally you want two batteries so that you always have one charged and ready to use if one goes flat.
All in all looking at the Milwaukee M18 cordless grinder review one thing is clear, it comes offering unmatched balance and power regardless who is using the tool. In this case if you are one to use a grinder often, then no doubt this is the cordless grinder to use as it will not disappoint.
Having a cordless in your arsenal allows any work to be finished easily and quickly. Most people would know that doing a bit of research before you buy any type of power tool is extremely important to find the very best tool to meet their needs. In this article I’m going to identify the top 5 most important characteristics I look for when shopping for cordless drills.
Lightweight
The smaller sized and lighter weight a drill is, the easier it will be to use. The perfect cordless drill will probably be light-weight and also well-balanced, which makes it simple to handle. Keep in mind that the higher the voltage is, the heavier the drill will be as the electric battery is larger and heavier with regards to its voltage.

Battery Life
A lithium battery is regarded as a high-performing, long lasting battery. It is the smartest choice I consider when choosing a cordless drill or virtually any battery-operated tool. Most of these electric batteries should keep a charge for very long periods and be capable of recharging in a short period of time. Ni-MH, Ni-Cad and lithium ion batteries are the most common battery types you will find. There’s a high weight/energy density ratio between your Ni-Cad as well as the more recent Ni-MH batteries, with the Ni-MH generating two times the capability with similar level of voltage. Simply put this implies increased run times without elevated weight. The top performer of the three is the Li-Ion; it has become the industry standard for cordless drills. However, the downside of Li-Ion batteries is that they can be quite expensive to replace, so keep that in mind.

Voltage
There are many different voltage sizes to consider before your purchase. You drill voltage is dependent upon whichever battery the drill is coupled with. These normally tend to be broken down into 3 categories: Light duty, medium duty or heavy duty. Light duty consists of 7.2V, 9.6V, 10.8V and 12V. Medium is 14.4V, 15.6V, 18V and 20V. While heavy duty contains the large workhorses 36V, 28.8V and24V. The rate and power matches the particular voltage that is generated by battery. If for some reason the labels come off the side and you are unsure on what size the battery is, you can always use a mutlimeter to test and see what size it is.
Speed and Torque
Variable and reverse speeds permit higher versatility for your jobs. Two speeds plus reverse are generally considered as the industry standard, with the lower speed being used for severe torque action; more control when driving screws and additional twisting for auger bits. Torque is the twisting power is it measures in Nm, and the higher the Nm, the more torque your tool will be able to produce.

Durability
Numerous brand cordless drills are sold on the market. Milwaukee, Dewalt and Makita are some of the bestselling cordless drills. The particular durability of the drills being produced today allows these power tools to last a very long time and perhaps even several lifetimes. You will often hear of people dropping accidentally dropping their equipment on to concrete floors, as well as the unsound advice of using the battery end as a mallet with no harm. This advice, obviously, is not advisable; however, claims such as these display the durability some of these tools.

Your jobs will be finished in no time at all, using the appropriate gear; any cordless drill is one of the best purchases someone can make to help speed up the job. The Consumer Reports web site is a great place to find truthful reviews of cordless drills plus many other tools. Buyers who read these reviews will discover “at a glance” which drills to avoid and which drills are classified as the top performers.
The circular saw is a staple in any serious builders tool box. It is also an essential tool for home renovator’s or carpenters. There are several types distinguished by the kind of blade fitted to it, there is 6 inch (150mm) blade size and larger ones like the 235mm size. Because of how dangerous the power tool is, let us look at the safest steps on how to use a circular saw.

The first step is to clearly understand the various different types or sizes of the circular saws. The different saw types have different uses and purposes. For instance, the 127mm trim saws are usually have a fine-toothed blade that is located on the left side of the motor. This makes it easy for one to view the blade path. Then we have the 150mm (6 inch) saws that is most common and is used for cutting to length lumber to be used in construction. It can also be used to cut plywood and composite material for building purposes.
The next step is to know the basic types of circular blades and their uses. The saw blades differ in number of teeth, composition, the blade quality and the width of the kerf that the blade removes. When you purchase a new circular saw, it will probably have a plain high speed steel (HSS) blade. You can replace them with the most durable blades, tungsten carbide tipped (TCT). The TCT is best used when cutting tough hardwoods, plywood or composite material. If you are looking to just rip through the length of the timber, you can use blades with less rake to the face of the teeth and with fewer teeth. The blades with many teethes, say around 40, give a finer and neater cut and can be used for crosscutting. For cutting concrete, metal and cement you can use diamond rim blades, Abrasive blades, Dado blades and Special tempered alloy blades.
More on tungsten carbide tips: http://home.howstuffworks.com/question341.htm
Always ensure that you have supported the material that you are cutting. There shouldn’t be anything underneath the material that will make the blade react as you cut. For instance, it is a common mistake where people place a piece of plywood on the floor that is concrete, not only can this be a highly dangerous mistake, you’re also going to be doing severe damage to your saw. Make use of a saw table or sawhorses when you want to cut your materials, having your work area at the correct height is going to save your back too.

Before you cut the lumber, timber or any other material, measure twice and mark the length you desire to avoid wastage. Use a measuring tape, stick rule or a scaled rule and then a square (tri-square, angle square or a steel square) to indicate where the blade should travel for your desired length.
For safety purposes as well, set the saw to the require depth of cut. The blade shouldn’t be showing too much that the job requires. For example, if you are cutting a 50mm thick timber, the blade should be set to around 55mm or 60mm. This technique helps to minimize kickback while cutting.
Last but not least, place the saw guard in a smooth running condition. The guard should be able to spring back in its place immediately you lift the saw from cutting. Then as you push it onto cutting again, the guard should slide up gently. I always insist that people should ensure that it is in the down position before you place it down on after using it.
Safety is the absolute key in knowing how to use a circular saw. It is a dangerous tool mainly because of the sharp blades and the power it uses. However, if you follow the steps above, like I did, you will be able to safely and comfortably use a circular saw for any job.
If you still need assistance, I have attached a great instructional video below.
If you can’t already tell, I love my power tools. I love the way they feel in my hands, I love the way they get things done, I even love the sounds they make – there’s just something about hearing the roar of a powerful circular saw rip through some timber. But even I get tired of listening to them sometimes. One of my resolutions this year is to renovate my workshop and one of the things I want (need!) to buy is a tough and loud worksite radio. I know that I need something with a good sound quality at high volumes (there is nothing worse than turning your radio up as high as it will go and getting a tinny, buzzy sound), and it needs to be loud enough to overcome the sounds of my tools. I also need something that’s durable and that can stand up to rough treatment. I also want one that can run on either batteries or electricity. What are the best worksite radios out there? I did a little research and here is what I’ve come up with (these are simply my opinions, in no particular order).
The DeWalt DCR015 12V/20V MAX Worksite Charger Radio is another fantastic choice. Durably constructed and capable of charging your tools in addition to providing great sound, it’s significantly lighter (14 lbs. total weight) than the Bosch radio above. Like the others on this list, the DeWalt has a protective cage around it too.

Ridgid, the company that makes the Cordless Radio has posted a video on YouTube depicting this radio being run over by a truck! That’s houw tough this thing is. They also smash it with bricks and timber and it still keeps on playing. It’s also got a handy little spot where you can store your phone or iPod. The sound is pretty good, too, although not quite the level of the Bosch.
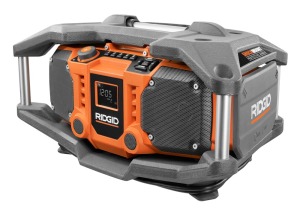
The least expensive radio on my list, the 18V Compact Lithium-Ion Cordless Job Site Radio is a bit more basic than the others. However, its durability, convenient size, and sound quality make up for any bells and whistles it might lack. It’s also compatible with iPods and other players. A great little radio for smaller worksites or home workshops, esprcally for those on a
budget.

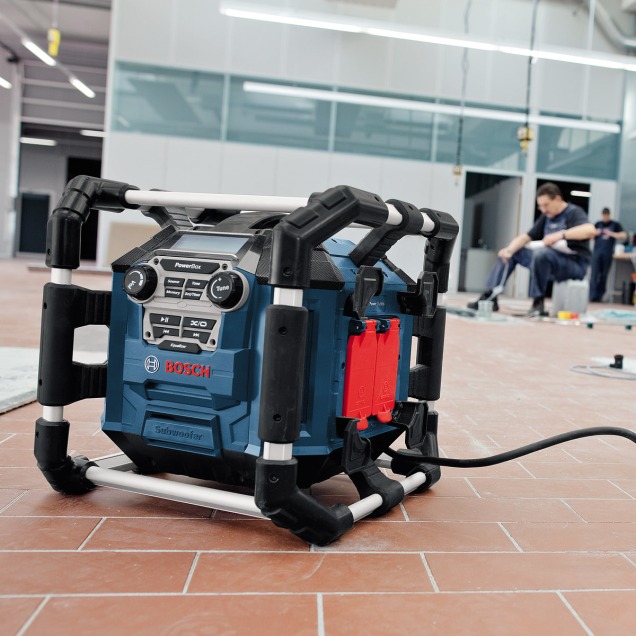
The Bosch PB360SC Power Box Jobsite Am/FM Radio/Charger/Digital Media Stereo is the Porsche of worksite radios. As you might expect from Bosch, the sound is incredible, it runs on either batteries or AC power, and its Bluetooth capability allows you to listen to stored music or internet music within a range of 150 feet. A roll bar protects it in the event it gets dropped, too. It’s the heaviest (24 lbs.) radio on my list.

Finally, have a look at the Milwaukee M18 Job Site Radio and Charger. This one is even more expensive than the Bosch, but the sound quality is spectacular. It’s also got storage, Bluetooth capability, and the ability to charge your Milwaukee tool batteries. It’s a little on the heavy side (19 lbs.), but still portable. Durable construction and the option to run it on AC power or batteries make it a very convenient choice.

After doing my research, I have concluded that I am going to buy the Bosch PB360SC Power Box. It simply has the best of sound quality and volume, along with the durability that I’m after.
I think it is important for any builder worth their salt to have tools for their trade. If you’re just getting into the building trade, or are a bit of a home handyman just wanting to start up a tool box then there are some tools that, in my opinion, are essential to have at your disposal. Here are my personal top 5 tools that every builder should have.
1. A Power or Cordless Drill
Drilling holes is something that you’ll be doing on a day to day basis as a builder. It is, therefore, important for a builder to invest in a good quality drill. You have the option of either a power (with a cord), or a cordless drill. A power drill will enable you to work long without having to stop to recharge or change your batteries. This is a great benefit, due to the fact that spare batteries can sometimes cost as much as half the price of the drill. Look for cords that are more than six feet long.

A cordless drill will enable you to be much more portable and due to the smaller size of some of them, allow you to get into tight spaces with ease. The biggest advantage is being able to drill in areas where you have no accessible electricity.

2. Sander.
Sanders are really helpful. They give you a perfect finish on whatever timber you’re working with. Get a sander from an established, trusted brand and it will last you forever. I personally have a DeWalt random orbital sander random orbital sander that I have had for years and has never skipped a beat. There are various types of sanders including; finishing sander, belt sander, detail sander and a drum sander so choose the best one for your needs.

3. Circular Saw.
Invest in a circular saw whether or not you have a table saw. My circular saw is convenient in that it is small and portable enough to carry around. Even a good quality circular saw will be much cheaper than a miter or a table saw. When buying a circular saw, look for one that around the 5200rpm mark – this will ensure you’re able to rip through any timber with ease.

4. Jigsaw.
There are maneuvers that a circular saw cannot make. For instance, when working ornate shapes on a piece of wood, you will need to use a jigsaw. Since it is light and quite easy to control, it comes in handy when working on smaller projects too. Like most other power tools, you have to choose between one with a power cord and one with a battery. For the jigsaw, I prefer one with a power cord – this is simply due to the fact that in my working life, I have very, very rarely come across a situation that I’ve needed to use a jigsaw and there hasn’t been a power source available. A variable jigsaw with speeds between 500 and 3,000 strokes per minute is preferable. A jigsaw with an adjustable foot will ensure that you can make angular cuts.

5. Variable Speed Rotary Tool.
A rotary tool is essential to both craters and builders. What I like about this tool is that it is an extremely versatile tool and can handle various tasks including carving, polishing, cleaning and drilling. It is also conveniently light for use in delicate tasks. It is advisable to look for a rotary tool with variable speeds and detachable or replaceable motor brushes.

There you have it, this is my list of 5 power tools every builder should have. Buy from established companies with known brands so that you are assured of quality. Always look out for warranties and after sales support before buying power tools.
